UPDATE: Great to see the piece reposted by Photoshelter and featured on ISO1200!
We hope you learn from the following guide how relatively easy it is today to set up your own wireless digital image transmission system, leveraging off-the-shelf technology from Nikon and Photoshelter, and thus keep pace with larger agencies and other news sources to transmit images in near real time, or conversely, simply share imagery from a shoot with offsite partners and creatives. We present below a short intro video covering some basics, but since the lionshare of this information is best presented in written form, we’ve included an extensive blog post with screen captures that we’ll continue to update with clarifications and newer technological information as we refine our system.
1. We’ll first cover the three components required for digital image transmission:
2. We’ll start with a wifi adaptor for your camera, like the WT-5a or the older WT4a, which while slower and requiring a separate battery, does feature a generic RP-SMA antenna connector so you can purchase aftermarket higher gain 7 or 9dbi antennas. While the WT-5a works directly with the high end D4/D4s cameras with a dedicated connector (or additional cameras coupled with the UT-1 Communication Unit), the WT4a works with most of the professional cameras in the Nikon line via a standard USB connection. (Hint: If you’re renting a WT4 and using a D800 or other camera supporting the newer USB3 standard, the transmitter will likely come with a USB2 cable, so you’ll need to have your own USB3 cable.)
3. Next, you’ll also need an available WiFi network at your venue, thus speak with the IT contact or bring your own Apple Airport (or generic brand) Wifi Router. Configuring those are outside the scope of this tutorial, but it must be in the configuration of a wireless network (SSID) with a password for access. The transmitters at this time cannot negotiate an web login window or purchase service option found commonly at places like hotels, airports and many universities. However, a better and more universal option these days is just using the built-in wifi hotspot technology of devices like your iPhone, which we’ll use as an example here, configuring in step 6. (Hint: Keep in mind the inherent limitations and costs of transmitting over a cellular hot spot, given the larger files you may be transmitting, but also potential issues that might arise, certainly in competition environments, where your new system tests fine prior to the event, but then as fans and other crowds come into the area and begin using cellular bandwidth, performance can really drop off.)
A. I recommend keeping all of the various components, login names, passwords, etc, as short as possible because:
5. Finally you’ll need a FTP destination, be it an FTP server of your choice that others might access manually, or the preferable way, as I’ll demonstrate now, configuring a custom Photoshelter FTP login so that images are automatically posted to and browesable to any client in either a public or password protected Photoshelter gallery.
A. First I proceed to my Photoshelter, login in and proceed to the administration back end.
B. Then to my Images tab
C. Create a New Gallery named whatever you’d like it to be and with the access settings you prefer.
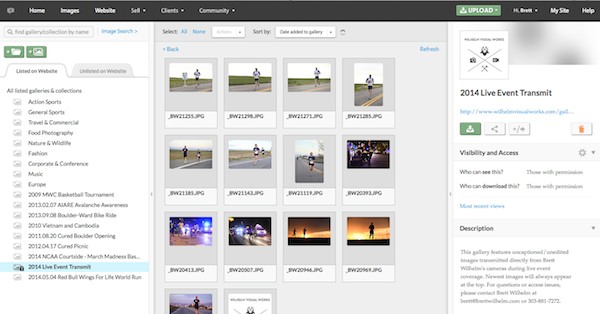
D. I’ve named mine “2014 Live Event Transmit”, placed it as “Listed on Website” and password protected it for both viewing and download so on clients I want can access it. I’ve also set the download permission under Visibility and Access to: DL Type: JPEG – original size, so that if I transmit a RAW, the standard client can only obtain a JPEG equivalent (Hint: Photoshelter does a decent job with a flat conversion, but test for yourself, especially with new cameras as they debut)
E. In the Gallery Description I enter some generic text about what the gallery is used for and how to contact me with questions or problems, this information will display above all the thumbnail images when clients start viewing.
F. Now I proceed to the Upload Button and select from drop down menu: Incoming FTP
I. From Incoming FTP page, select: Add a new incoming FTP
II. Under Add a FTP user
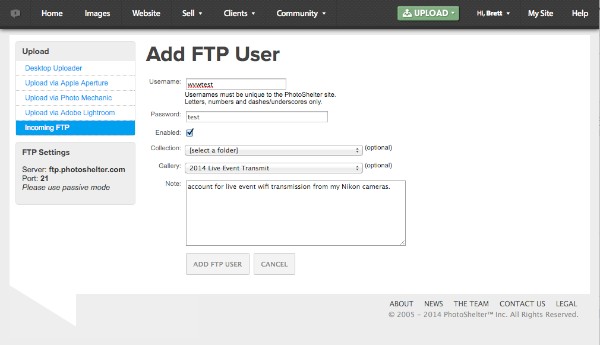
III. Username: wvwtest (or the username of your choosing)
IV. Password: test (or the password of your choosing)
V. Enabled (checked) Your account may only allow you to keep one enabled at a time, so ensure this is enabled for use when you need it
VI. Collection: (leave blank)
VII. Gallery: 2014 Live Event Transmit (or whatever you named your gallery in the above section)
VIII. Note: (any notes to help you keep the accounts strait)
IX. You should see the user listed now under Incoming FTP and double check that it’s listed in the 4th column as Enabled: Yes
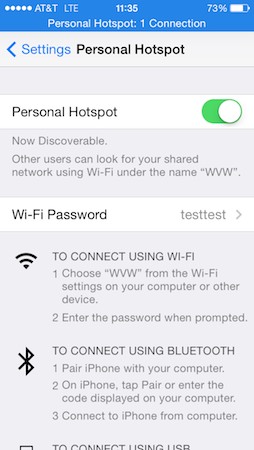
6. Next we’ll enable our wifi hotspot:
A. On the Apple iPhone, we’ll go to Settings > Personal Hotspot and enable it (You may also need to call your service provider to make sure your package allows this)

B. Enter a password for the first time if you’ve never used this feature before. (I recommend keeping it to the minimum length, 8 characters), for simplicity’s sake I’ve entered: testtest
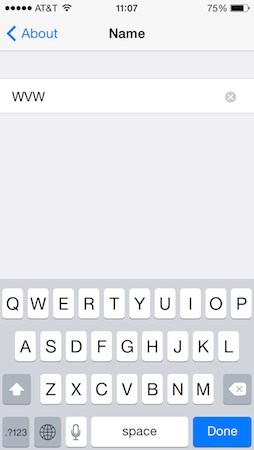
C. Finally, the network name will be auto generated based on the name of your phone, so I actually changed my phone’s name, under General>About>Name, from Brett Wilhelm’s iPhone to just WVW to simplify this.
D. My WVW network is now active and feeding the cell data signal to local devices, I can monitor the status at the top of the window, showing the number of connections (cameras or devices using the wireless hotspot).
7. Its now time to configure your camera and transmitter. Your first item of business will be ensuring your camera has the latest firmware. Since onboard software is driving most of this process, continuing improvements in network security and error handling have happened via firmware updates, so make sure you’re using the latest. Download and install via the Nikon Support Site if necessary.
8. You can now configure the camera’s wireless transmission profile, either via the Nikon’s Wireless Transmitter Utility (available from the Nikon Support Site, current version 1.5.0) on your computer with the camera attached via USB, or you can use the newer camera’s built in configuration wizard (the later generations all have this). Pros and cons to both:
A. The software’s great because you can enter in all the info via a full keyboard, however, you then need to test it as a separate step and perhaps revisit your computer to re-configure. You also need to know a little more about WiFi and FTP terminology so you know how to gather the appropriate information for your network and ftp information.
B. A nicer newer option is now the built in wizard, which conveniently not only auto senses a number of relevant details (so you don’t need to know as much about the technology/terminology in play), but also tests each step (wifi connection, then ftp connection) as part of the setup, so by the time you’re done, you know everything is configured properly. Conversely, however, entering all the data via the onboard controls can be a little clumsy (remember what I recommended about keeping everything short and simple, this is why!)
9. If you are are using the Nikon Wireless Transmitter Utility, connect the camera via USB cable, turn it on and launch the Utility.
A. You’ll get a welcome screen reminding you to make sure your battery has sufficient charge.
B. Proceed to the next screen where you’ll select which hardware you’ll use, in this case we’ll select WT-5.
(Hint: If you plan to use a Wired (Cat 5 ethernet cable) direct connection, say perhaps from a fixed basketball end line position or baseball photo well position, you’d skip steps D.III-VIII below as you will not be prompted for wireless network information)
C. Next we’ll select “Add/Edit Profiles”.
(Hint: If the Utility complains that it can’t find a camera attached, close the Utility, turn off the camera, remove the compact flash card, turn on the camera again and launch the app. I have no idea why this error happens or how removing the card fixes it, but it always seems to)
D. General Settings

IV. Communication mode will be: Infrastructure
V. Channel will be grayed out as the transmitter will auto determine the best channel within a given wifi spectrum
VI. Authentication: WPA2-PSK (at least for the network generated by the iPhone, the most modern, yours may vary)
VII. Encryption: AES (again in the case of the iPhone)
VIII. Encryption key will be the password you created for your network, in my case I’ve used: testest
IX. Key index: should be grayed out
E. TCP/IP settings will be checked for “obtain IP address automatically” in all but the most unusual setups.

F. For FTP Settings, at least for our Photoshelter setup, will be as follows:
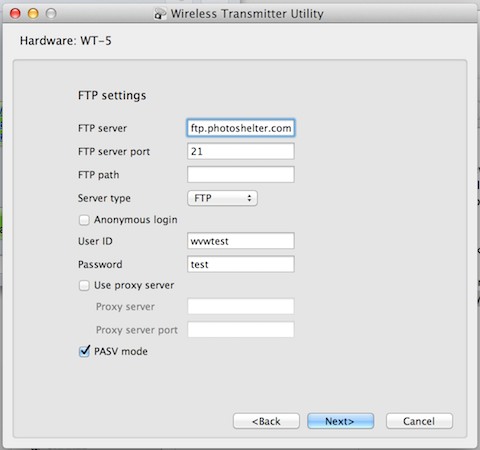
I. FTP server: ftp.photoshelter.com
II. FTP server port: 21
III. FTP path: (leave blank for photoshelter)
IV. Server type: FTP (unless your setup uses secure FTP, thus SFTP)
V. Anonymous login will remain unchecked
VI. User ID: wvwtest
VII. Password: test
VIII. Proxy Server will remain unchecked
IX. PASV mode will be checked (as Photoshelter recommends Passive Mode for FTP)
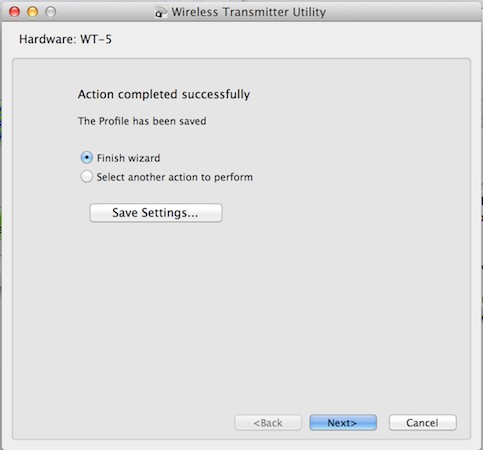
G. Next you’ll have a chance to review your settings, confirming everything is entered correctly.

H. Then finally a screen where you can save your settings locally on your computer (to apply to another camera) or just click Finish to store/save on your camera. If you re-use these settings in applying to another camera, you’ll likely have to re-enter the passwords for wifi and ftp, as the profiles do not store those.
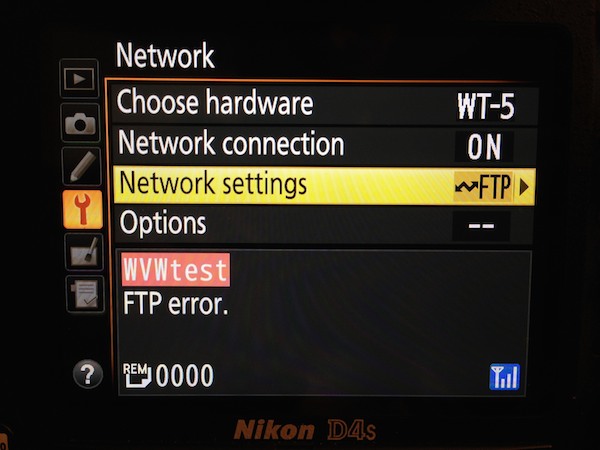
10. If you are using the built in wizard, you’ll proceed to the Set Up (Wrench) menu and scroll down to Network.
A. First we’ll choose hardware: WT-5 (or WT – 4) (either of which need to be connected and/or powered on to be “seen”)B. Network Connection: OnC. Network Settings: Create profile
I. Select: Connection wizard
(Again, while the interface is a little clumsy having to type with a virtual keyboard and thumb control, it’s nice that the wizard is basically testing the connection at each step, so you know immediately if you have an issue)
II. Connection type: FTP Upload
III. Enter a name: WVWiPhone (again, anything that makes sense to you, by default it is WLAN1)
IV. Choose Method: Search for a wireless network
V. You should see your network you configured in step 6 available, select it
VI. Enter Password you created in step 6
VII. Choose how IP is obtained: Obtain automatically
VIII. IP address configuration should complete and display the relevant numbers (you won’t need these)
IX. Choose FTP server type: FTP (at least for Photoshelter system)
X. Enter server address: ftp.photoshelter.com (note that this length makes the wizard jump to the next screen at the trailing period in .com, making it appear as though you just deleted everything, so just keep typing.)
XI. Choose login method: Enter user ID
XII. Enter user ID: wvwtest
XIII. Enter password: test
XIV. Choose Destination Folder: Home folder
XV. Setup should report complete
XVI. Choose: Connect and exit wizard
11 . Finally, once you’ve successfully configured you can copy the configuration to a card and load into your other cameras. However, you will need to re-enter the passwords for both wifi network and ftp, as these are usually not saved to the configuration file when passing to a new camera.
12. Congratulations, at this point, your wifi network is available, your camera is configured to transmit and you’ve already setup your destination on Photoshelter.
13. A few tips from here, first off, remember to keep both the Personal Hotspot and the Network Connection turned off when not in use as both can really drain the batteries quickly.
14. In Network>Options (you can adjust these as necessary, but below are my recommendations)

A. Make sure auto-send is: OFF (otherwise it tries to send every picture and you likely don’t want that.)
B. Delete after send: OFF
C. Send file as: JPEG only (While the transmitter can send RAWs, and Photohselter can accept and convert RAWs just fine, you’re asking a lot of your network connection to maintain a connection for 20MB files. A nice method to circumvent is to set your camera for perhaps RAW + JPEG Normal or Basic, thus you have the RAW for longterm quality written to card, but for immediate needs your camera is only attempting to send a 3-5MB JPEG file to the live gallery)
D. Overwrite if same name: OFF
E. Protect if marked for upload: OFF (this feature ideally should both lock/tag the file and mark for transmit, which in spirit is great and time saving, as you’d likely want to tag for later anything you actual transmitted, however the tag/locks don’t seem to “stick” after a file is transmitted, thus I keep this feature off and both tag/lock and mark for transmission as separate steps)
F. Send Folder: default setting
G. Deselect all?: Option (This is a great option if, say, you get jammed up with a terribly slow network connection and you have 20 images cued and you’re having trouble and want to start a session over, this is a great way to deselect all the files marked for transmit and just go back and select a lesser number)
15. You’re now ready to transmit. Everything is turned on, connected and ready to transmit. In reviewing images you’ve taken, you select the file you wish to transmit, and, at least on the D4/D4s, you press both the OK and the center button of the multiselector bottom simultaneously. (This button combination has varied from camera to camera, so you google or the manual is your friend here) You’ll see a small white “lighting bolt” looking arrow symbol appear on the image, indicating it’s marked for transmission. This arrow will turn green as it actually starts transmitting, and finally turn blue to confirm it has sent.
16. While transmitting, you can return to the Set Up > Network menu and beneath the four main submenus you’ll see a status.
A. If you’re successfully connected, the profile name will be highlighted in Green

B. The name of the file currently sending (if any)
C. It will show the number of files remaining to transmit: REM0001 or similar
D. A total time anticipated for transmission for the entire cue of images
E. Finally a small blue box lower right will list your signal strength in up to three small bars.
F. If you’re Profile Name is Red it will list either
17. A few housekeeping/troubleshooting notes:
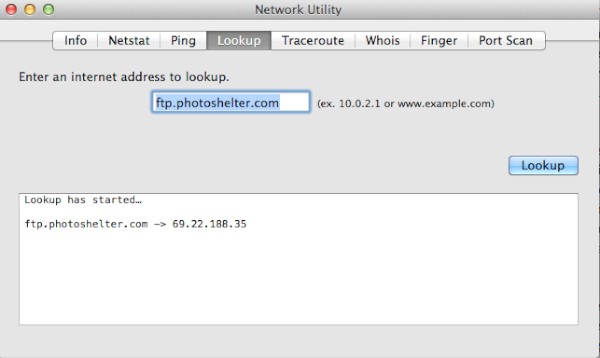
- If you have get repeated errors with a “known good” FTP site, you may try subbing in the IP address of the site in lieu of the “domain name (aka ftp.photoshelter.com). Different transmitters/firmware have different levels of error handling and on some networks the delay in looking up the ftp address on available DNS servers is a bit too long. Thus you can use something like Mac’s built in Network Utility>Lookup tab to identify the actual IP address of the server. In this case it’s 69.22.188.35 and enter this in the FTP server address in your profile instead. However, the IP can change overtime, so be sure to recheck often before a shoot and thus the proper domain name is always preferable when you can use it.

- Using an iPhone or similar cellular device as your Wifi hotspot is a great “bring anywhere option” but there are a few limitations, including speed and cost per MB/GB of your plan. Also note that in some crowded environments data rates may be fine until the audience shows up, but as soon as the event gets going and 50,000 people are instagraming and checking Facebook, the data rates will crash and you’ll be sunk. Similarly some venues prohibit creating your own Wifi network, you’re not going to just roll into the SuperBowl and fire up your own wifi device, it’s heavily regulated. This is where speaking to the local IT manager is key.
- If possible, especially if multiple photographers are sending, rename your camera files so that at least your initials are included so they know who took the image (since the images will be transmitted without any form of metadata)
- If possible, use your camera’s built in Image Comment or Copyright information to enter your relevant info
- A nice new feature of the Nikon D4s is the ability to unload full IPTC Metadata into your camera to auto append to each file, thus if you’re shooting a certain event, you could load in all the relevant caption/credit info.
- You may also leverage the Menu > Retouch options to further tune/edit/crop your original images (especially if you’re shooting RAW) and save as a JPEG before transmission, great for when you have a great image that you’d like to transmit to the client immediately, but would prefer to make some basic exposure or crop edits yourself prior.
- Remember to keep both the Personal Hotspot and the Network Connection turned off when not in use as both can really drain the batteries quickly.
- Be careful not to cover or shield the transmitter with your hand when transmitting, it’s the natural position to work the controls, but then clear your hand
- Another oddity is that when the network connection is enabled, you can’t lock the mirror up for cleaning when you’re attempting to remove dust spots. If you ever see this option under Setup menu greyed out, see if you network connection is turned on and turn it off. If the network connection is on and you have images queued, you may also have issues reformatting the card or turning off the camera, so keep this also in mind.
We hope you’ve enjoyed and learned from our extensive guide to wireless image transmission and employ this guide as a resource in setting up your own systems. Please let us know what questions you may have and what might need additional clarification. We’ll also do our best to keep this guide updated with the latest information as newer technology debuts.

Leave a Reply to admin Cancel reply