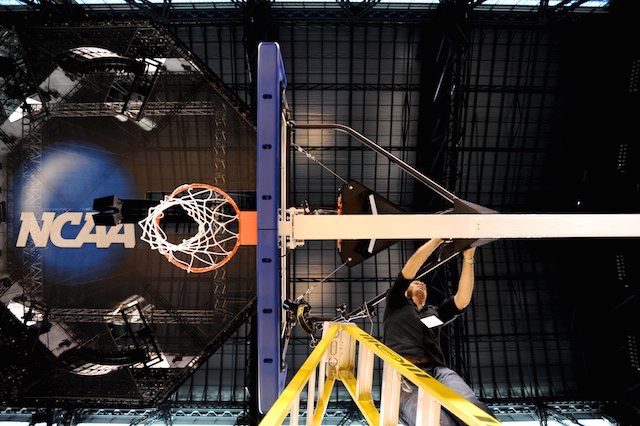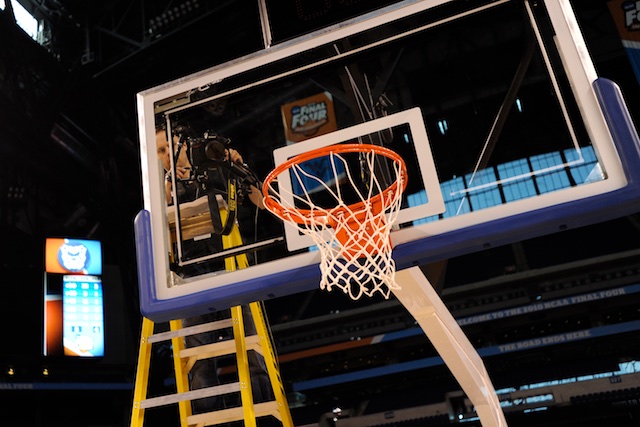
The Final Four week, likely the NCAA’s largest event every year, is a flurry of preparation, logistics and photographic coverage, starting well before tipoff of Saturday’s national semifinals. One of my duties each year, early in the week, is mounting our four NCAA Photos Nikon backboard and stanchion pool cameras, which during the course of all the games feed every image in real time to onsite Associated Press servers and are, from there, pooled to all the media outlets for publication nationwide.
Last year at the Final Four in Dallas, I took some time to create the below video outlining the setup, triggering, transmission and, perhaps most importantly, safety measures involved in installing one of our backboard cameras. It’s important to note the gratitude I have for my time under the tutelage of Rich Clarkson, as well as AP staffer and longtime faculty at Clarkson’s Sports Photography Workshop, Mark Terrill, a true master of remotes. Big thanks also to the annual help we receive onsite from the fine folks at Nikon Professional Services, as well as the many incredibly hard working techs of Sports Illustrated who descend on the tournament each year to install and maintain a myriad of SI remote cameras, and are always happy to lend a hand and, more importantly, their vast knowledge of tips, tricks and hard won experience. They are the best of the best.
Hopefully the video will give you a great overview of what is involved to capture imagery from such a unique angle, but below I’ve outlined a more itemized list on what we have in place and why:
Camera – Nikon D4s Camera Body
Key to our efforts are the speedy 10fps frame rate and high ISO performance of the D4s. Since we’re firing the camera remotely from a courtside position, without the benefit of seeing through the viewfinder, the short bursts of frames are critical to capturing the often chaos beneath the rim. The high ISO delivers beautiful noise free images in challenging low light conditions (more on that below).
Lens – Nikon 17-35mm f2.8 Lens
We usually frame each end of the court in different ways, one is racked out to 17mm to incorporate a wider frame of view, including the Final Four logo, to give those frames a looser composition and more historical context, whereas the opposite end is pointed further downward and at more of a 20-24mm range to tighten in on just the rebounding and scramble beneath the net.
Filter – 77mm Circular Polarizing Filter
Since we are shooting through the backboard glass and additionally need to position the lens at somewhat of an angle to the glass itself, reflections off the glass from behind and below the basket quickly become an issue. In conventional scenarios, we can combat these reflections with black cine foil, gaffers tape or other materials to blackout the area around the lens, but at the Final Four and other national televised events, they prohibit the use of blackout material to preserve a cleaner presentation, thus we rely on polarizing filters instead. Positioned on the front of the lens, we then rotate the filter to the correct orientation to minimize (and hopefully eliminate!) any reflections. The trade off, unfortunately, is that the filter cuts often 2+ stops of light, hence why the high ISO performance of the Nikon D4s and its other modern equivalents are so critical to still allow high enough shutter speeds to stop the frenetic action.
Mounting – 2 Manfrotto 244N Variable Friction Magic Arms, 1 Manfrotto 143BKT Camera Platform, 3 Manfrotto Super Clamps, Vise Grips

Two variable friction magic arms, one with the camera platform on one end and super clamp on the other, whereas the other magic arm has two super clamps. With both strength and safety/redundancy in mind, one magic arm mounts the camera, and the other dual clamp arm braces the original, also mounting to the backboard support arms and then clamping on the other and at the camera mount joint of the first. We also always prefer to mount the camera high on the shooter’s left of the basket, so that a more common right-handed player driving to the basket with his right arm outstretched doesn’t block his own face from the cameras perspective. Finally, while we want the lens as close to the glass as possible to minimize reflections, we ensure the front element is at least about a 1/2 inch from the surface of the glass, giving just enough room that the lens is not banging in to the glass with the vibrations from every dunk. Bring vise grips to tighten everything down when you’re done, taking care not to strip anything, it’s a delicate balance!
Safety – Steel Safety Cable + 1” O-Rings
As action at the rim is constant and often violent, player safety is paramount, thus even with the dual magic arms, we still safety cable the camera itself to the backboard support arms, using 1″ O-Rings through the camera strap mounts for a clean and strong mount point.
Settings – Manual, Approx 6400ISO, 1/800th, F5.6, Kelvin White Balance
These vary by venue based on available stadium lighting, but as the tournament circulates these days among very large and usually very modern afoot all stadiums, our courtside cameras are usually set in the area of ISO 1600, 1/1000 at f2.8 or some equivalent. With that in mind and keeping in mind the compensation for the 2stop loss of the filter, we usually set the cameras in Manual mode, somewhere around ISO 6400, 1/800th which is still quite decent for freezing action at such wide angles, and finally f5.6, giving a decent depth of field of 3-4 feet at our Manual Focus to a point at about 8ft high just in front of and beneath the rim, the average height of a dunking or rebounding players face as they reach towards the rim. Finally we double check our White Balance, but dependng on the stadium we usually set that somewhere around 4300K.
Power – Nikon EP-6 + EH-6b AC Power Adaptor
We run Nikon D4s AC power adaptors to each camera early on in the week, thus never needing to check or change batteries through all the 4-5 days of practice and game action. Since the camera is set to never sleep via our release cable (below), the camera would quickly run through a normal battery and otherwise require constant swapping, difficult when ladder access would be required.
Triggering – Nikon MC-22 10pin Release Cable + Household Male Add A-Plugs/Female Add-A-Taps + Carol Brand 18/2 Gauge Lampwire + Thumbtriggers
We use a hardware trigger system via the cameras Nikon 10-pin connection, combining the correct 2 of the 3 MC-22A’s banana plugs to keep the camera awake at all times (eliminating lag on wake up), and mating to two-prong household connections/add-a-taps to 18-gauge lamp wire. The brand and gauge is key to ensure an easy fit within the standard Add-A-Taps and Add-A-Plus, otherwise you’ll find yourself stripping off insulation with a pocketknife at the last minute. We run the wire down the backboard stancion, (along with our power and ethernet cabling) and out to our courtside triggering position, mating with conventional thumb triggers. Alternatively, radio triggers like the commonly available pocket wizard system can be used, however hardwiring is always preferred to avoid interference issues in a noisy RF environment like the Final Four. If you are going to use Pocket Wizards or similar, always setup and/or check a channel reservation list to avoid conflicts, or alternatively pay for a custom channel via the manufacturer if they offer that service, but if you absolutely need it to fire, hardwire!
Transmission – Cat5e or Cat6 Ethernet Cable
We make use of the D4s built in Ethernet port and wire/program the cameras to transmit every image, RAW + JPEG Fine, to an onsite FTP Server. Once transmission is completed, the camera deletes the image from memory, as to not fill the cards, given swapping cards is very difficult without ladder access. If at any time transmission fails, the camera will write files to the card until transmission is resolved, so the use of large CF cards are key, otherwise a long disruption in transmission could fill the cards and force the camera to stop firing! There are a myriad of ways to configure the various options for all of the transmission settings, but that’s outside the scope of this tutorial.
Taping – Black Gaffers Tape
Once everything is set up, it’s time to lock down and tape off everything with gaffers tape. We tape down the focus/zoom rings and polarizing filter so nothing can move/change with vibration. We tape down the Ethernet and AC power cables so nothing can wiggle loose, then finally we tape down any extraneous lengths of safety/data/power/trigger cables so the overall look and presentation is as clean as possible and avoids any distractions to both players and tv angles.
Firing
A colleague then sits courtside behind our baseline photographer, with a thumb trigger in each hand for each end of the court, watching the action beneath each basket and timing short bursts of the cameras to align with peak action at the basket. An editor in the press room receives the stream and tags select frames, captioning and distributing images in real time.
Summary
That about covers it, though I’m sure most of the insight will be gained from the video itself. Let me know in the comments if you have any questions, comments or other feedback and I’ll do my best to answer. And with that, I’m flying home from East Regionals in Syracuse tonight for 12 hours to do laundry and repack before flying out to Indianapolis for the culmination of March Madness!
Leave a Reply